“How big should my QR code be?” is the most practical question in the whole subject — and the most commonly guessed wrong. Print it too small and half your audience gives up; print it needlessly huge and you waste space and design goodwill. The good news is that a single rule of thumb answers it for every medium, from a business card to a billboard. Below is that rule, a print-ready reference table you can keep, and the three things a simple size chart cannot capture.
The one rule that governs everything: 1/10
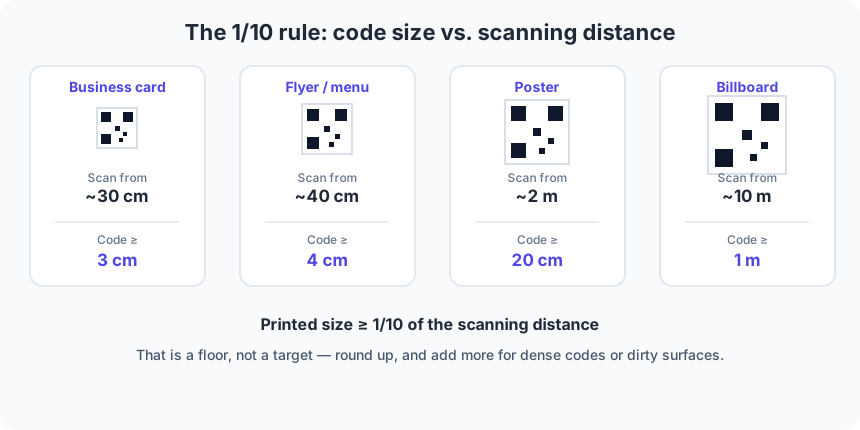
Almost all QR sizing collapses into a single relationship: the printed code should be at least one tenth of the distance it will be scanned from. Scanned from arm’s length — about 30 cm, like a flyer in someone’s hand — the code should be at least 3 cm across. Scanned from 2 metres, like a poster on a wall, it needs to be at least 20 cm. The camera has to resolve the smallest black-and-white squares (the modules) clearly enough to tell them apart, and that gets harder the further away you are.
Two cautions keep this rule honest. First, it is a floor, not a target — round up, and go bigger whenever you can. Second, it assumes a clean, well-lit, straight-on scan; glare, movement, low light, and cheap cameras all eat into your margin. When you are unsure, larger is always the safer mistake.
The reference table
Sizes below apply the 1/10 rule to real placements, then round to practical values. “Minimum” is the smallest you should risk; “recommended” is what actually works comfortably in the field.
| Medium | Typical scan distance | Minimum size | Recommended | Notes |
|---|---|---|---|---|
| Business card | ~25–30 cm | 2.5 cm | 3–4 cm | Keep the URL short so the code stays low-density. |
| Flyer / menu / table tent | ~30–40 cm | 3 cm | 4–5 cm | The everyday case; level M is fine. |
| Product label / packaging | ~15–25 cm | 2 cm | 2.5–3 cm | Scanned close but on a tiny surface — short data is essential. |
| Poster / A-frame | ~1.5–3 m | 15 cm | 20–30 cm | Consider level Q if it lives outdoors. |
| Shop window | ~2–4 m | 20 cm | 30 cm+ | Watch for glare; leave space so passers-by can step back to scan. |
| Vehicle / large signage | ~3–5 m | 30 cm | 40–50 cm | Level Q or H for dirt and weather; only scannable when parked. |
| Billboard | ~10 m+ | 1 m | 1 m+ | Rarely worth it — nobody scans a billboard from a moving car. |
Three things the table can’t capture
1. How much data you encode. A short link produces a small, low-density code with big, easy-to-read modules. A long URL, a full vCard, or a Wi-Fi string forces a higher version with many more, smaller modules — which then need a larger print to stay legible at the same distance. If a code looks busy and crowded, shorten the data before you enlarge the print.
2. The quiet zone. Every size in the table refers to the code itself. Around it you also need a clear margin — the quiet zone, roughly four modules or about 10% of the width — with nothing printed in it. Crop that margin away to save space and scanners struggle to find the code at all, no matter how big it is.
3. Error correction adds size. Raising the error correction level packs in redundant data, which pushes the code to a higher version with smaller modules — so an H-level code needs a bigger print than an L-level one carrying the same URL. Our guide to error correction levels explains exactly when that trade is worth making.
Pixels or centimetres? What “size” to export
There is a catch that trips people up: on screen a QR code is measured in pixels, but on paper it is measured in centimetres, and the two only meet through print resolution (DPI). A 512-pixel PNG printed at 300 DPI is about 4.3 cm wide — fine for a flyer, too small for a poster. Enlarge that same PNG to poster size and the pixels stretch into a soft, blurry code.
The clean way out is to export as SVG for anything printed. An SVG is a vector: it scales to any physical size — card or billboard — with perfectly sharp edges and no pixels to blur. Reserve PNG for on-screen use where a fixed pixel size is what you want. Our SVG vs. PNG guide covers when to use each.
On a screen: slides, TV and video
Not every code ends up on paper, and screens add their own twists to the 1/10 rule. The trap is viewing distance: a code on a conference-room slide or a TV ad is being read from several metres away, so it needs to be far larger on the slide than the tidy little corner code you designed at your desk. Size it against the distance the back row will sit at, not the distance to your monitor.
Motion adds a second constraint. A code that flashes past in a video is useless — leave it on screen, perfectly still and unobstructed, for at least five to eight seconds so people have time to notice it, lift a phone, and scan. And because displays vary wildly in brightness and glare, keep the contrast strong and the background solid; a code that looks fine on your calibrated monitor can wash out on a dim projector or a sun-hit shop television.
Sizing it in QRStudio
In QRStudio, set the export size with the Size slider for raster files, or download SVG and forget pixels entirely for print. The built-in Scannability check beneath the preview flags when your export is on the small side for the density and error correction you have chosen, and reminds you to keep the quiet zone. Then do the one test that never lets you down: print a single copy at the exact final size and scan it from the real distance, on more than one phone, before you commit to a full run. Our print best-practices guide covers the rest of the pre-flight checklist.